
BLOG
Low-Cost Waterproofing For Prototypes
WRITTEN BY ANGELA MAY, FORMER MECHANICAL ENGINEER
AND SENZENI MPOFU, FORMER SALES ENGINEER
As a team, we are pretty comfortable developing products that can withstand even the most extreme of environmental conditions. We have made electronics for use in extremely dusty conditions. We tackled innovation for prolonged exposure to subzero temperatures – both in the Arctic and on ski slopes. We have even contributed towards the development of structures that can withstand desert conditions. Recently however, we started working on a product whose intended use is within an unfamiliar environment – 10m underwater.
The core technical thesis was complex, as it involved detecting people using underwater ultrasound technology. However, the overall success of the project depended on ensuring that the device that we developed was waterproof since leaks would have compromised the function of the device, and rendered it useless.
This blog post outlines some of the learnings from our teardowns. It is by no means an exhaustive introduction to waterproofing – just a couple of findings that we thought were neat enough for us to share with you…
What are some of the common cost-effective ways of waterproofing an electronic device?
Search for inspiration
The patentable innovation behind the product we were developing was in its core technical function and not in the mechanical design. As far as the enclosure went, what we wanted were tried and tested waterproofing methods – nothing novel. As such, we surveyed the market for cheap waterproof electronics for inspiration for our designs.
Buy. Try. Tear Down. Reverse Engineer. Innovate.
Buy
The first stop in our quest was Amazon, where we identified low cost, highly rated waterproof gadgets. After combing through thousands of products, the following six made the cut:
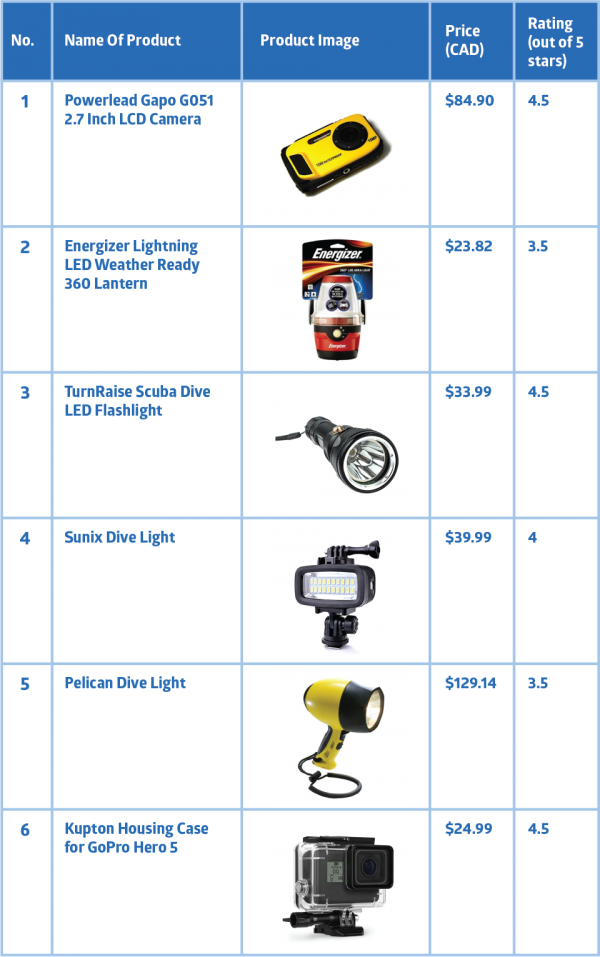
*prices fluctuate because life is unpredictable and exciting
Try
All of the devices were subjected to a pre-immersion test before being torn down. While function obviously mattered, we were also on the lookout for signs, however subtle, of leakiness. Of the six, only the Powerlead camera and the Energizer Lantern let out bubbles when immersed in water. Regardless, function was not interrupted in any of the devices.
An interesting observation was that all of the gadgets, with the exception of the TurnRaise Scuba Dive LED Flashlight were buoyant, which makes sense: if you let go of your flashlight while underwater, you do not want it to disappear into the depths of the pool. Instead, you would want it to float to the top of the pool.


Teardown
This is obviously the fun part. All of the devices that we tore down used waterproofing methods that we were pretty familiar with. However, each of the devices used combinations of all of these techniques in ways that were unique to the function of each of the devices.
Waterproofing Techniques
1. Reduce the number of seal locations: Turn Raise
Having jointed parts presents opportunities for leaks and ingress. The hypothetical perfectly-waterproof device’s enclosure would be made from one continuous piece of impermeable material: no joints, and hence zero possibility of leaks. While ideal, such an enclosure would severely limit the function and aesthetic of the device. Of the six devices that we looked at, the Turn Rise Dive had the least number of moving parts. The flashlight is made from a solid aluminum; the only removable component of which was the battery holder.


2. Gaskets: The Power Lead – mention that it violates previous rule
Where the enclosure comprises of two or more parts, ingress and leaks can be prevented by using mechanical seals, the most common of which are gaskets. Each of the devices that we tore down used gaskets in ways that were unique to their design. Of the six, the PowerLead Gapo had the most ubiquitous use of gaskets with a total of four different gaskets in different parts of the device:


3. O-rings: Pelican Dive Light + Kupton Housing
O-rings are torus-shaped gaskets which are designed to be seated in a groove and compressed during assembly between two or more parts. O-rings were an obvious choice for the Pelican Dive Light and the Turn Rise Light which are cylindrical. An interesting observation from the Pelican Dive Light Tear Down was that it uses double o-rings for sealing. This ensures that sealing is preserved even after water penetrates the first o-ring.
Lastly as o-rings are made from an elastomer, it is possible to stretch them to seal non-circular grooves, as was the case with the Kupton Housing Case.

4. Ways of providing sealing pressure: Sunix + Dive Light
Whether you use gaskets or o-rings, the effectiveness of the sealing technique that you will employ will ultimately depend on sealing pressure (among many other things). There should be enough system pressure to activate the seal, but not too much pressure as that would jeopardize the gasket/o-ring’s ability to seal. The three ways of providing sealing pressure that we observed from this tear-down were:
1. Use of Clips (Sunix Dive Light + Go Pro)

2. Threading (Pelican Light and Dive Flash light)
3. Use of fasteners (Powerlead Camera)
These are some of the most common waterproofing methods, some of which we incorporated into the design of the water-scanner that we were developing.
Wanna learn more about waterproofing?
Here are a couple of good introductory resources: